Table of Contents
- Why Podcast Editing Matters More Than You Think
- Free Podcast Editing Software Compared
- Setting Up Your Editing Workspace
- Basic Editing: Cuts, Trims, and Arrangement
- Noise Removal and Audio Cleanup
- Leveling, Compression, and Volume Consistency
- Adding Intro Music, Outros, and Sound Effects
- A Complete Editing Workflow from Start to Finish
- Exporting Your Finished Episode
- Key Takeaways
- Frequently Asked Questions
Why Podcast Editing Matters More Than You Think
Recording a podcast is only half the job. The other half - the part that separates amateur-sounding shows from professional ones - is editing. Learning how to edit a podcast for beginners is the single most impactful skill you can develop to improve your show’s quality, listener retention, and growth potential.
Consider the numbers. There are over 4 million podcasts registered globally, but only about 450,000 have published an episode in the last 90 days. Listener expectations have risen dramatically as the medium has matured. A 2024 survey by Edison Research found that 62% of regular podcast listeners said audio quality significantly affects whether they continue listening to a new show. Awkward silences, background noise, inconsistent volume levels, and meandering conversations are the top reasons listeners abandon podcasts after just one episode.
The good news is that learning how to edit a podcast for beginners does not require expensive software or years of audio engineering training. With free tools and the techniques outlined in this guide, you can produce clean, professional-sounding episodes that keep listeners coming back. Most podcast episodes can be edited in 30 to 90 minutes once you establish a workflow - a small time investment for a massive quality improvement.
Free Podcast Editing Software Compared
You do not need to spend money on software to produce a great-sounding podcast. Here are the best free options available in 2026.
Audacity - Best Free Option for Windows and Mac
Audacity is the most widely used free audio editor in the world, with over 100 million downloads. It is open-source, completely free, and available on Windows, Mac, and Linux. Audacity includes everything you need for podcast editing: multi-track editing, noise reduction, compression, equalization, and export to all common formats. The interface looks dated compared to paid alternatives, but the functionality is remarkably powerful. About 40% of independent podcasters use Audacity as their primary editor.
GarageBand - Best Free Option for Mac Users
If you own a Mac, GarageBand is pre-installed and free. It offers a more modern, intuitive interface than Audacity, with drag-and-drop functionality, built-in podcast templates, and a library of royalty-free music and sound effects. GarageBand’s multi-track editing is smooth, and its built-in effects like compression and EQ are easy to use. Many podcasters who later upgrade to Logic Pro started in GarageBand.
Descript - Free Tier Available
Descript takes a revolutionary approach to podcast editing by letting you edit audio like a text document. It transcribes your recording, and you can delete words, sentences, or entire sections by simply selecting and deleting text. The free tier allows 1 hour of transcription per month with basic editing features. The Pro plan ($24/month) unlocks unlimited transcription and AI-powered features like filler word removal and studio sound enhancement.
Spotify for Podcasters (formerly Anchor)
Spotify for Podcasters includes a basic audio editor that works in the browser. It is limited compared to desktop software, but it can handle simple cuts, transitions, and music additions. It is best suited for podcasters who want an all-in-one recording, editing, and hosting solution without installing any software.
Setting Up Your Editing Workspace
Before you start editing, set up your workspace for efficiency. How to edit a podcast for beginners becomes much easier when your tools and files are organized.
File Organization
Create a folder structure for each episode. A typical structure includes: a main episode folder named by episode number and date, a “Raw” subfolder for unedited recordings, an “Edited” subfolder for work-in-progress files, a “Final” subfolder for export-ready files, and an “Assets” subfolder for intro music, sound effects, and sponsor reads. Consistent organization saves you hours of searching for files as your show grows.
Project Settings
Set your editing project to match your recording format. For most podcasts, this means 44.1 kHz sample rate and 16-bit or 24-bit depth. These are CD-quality settings that balance file size with audio quality. If your raw recording is at 48 kHz (common with some interfaces and recorders), you can either work at 48 kHz throughout or convert to 44.1 kHz during export.
Import and Label Tracks
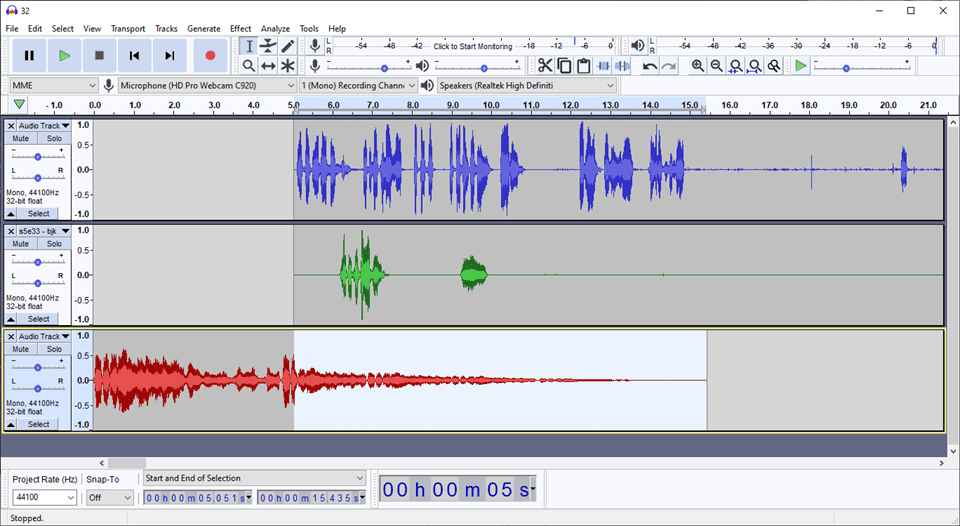
Import your raw audio files into your DAW. If you recorded multiple microphones on separate tracks (which you should for multi-person podcasts), label each track clearly - “Host,” “Guest 1,” “Guest 2,” etc. Color-coding tracks also helps you navigate the timeline quickly during editing.
Basic Editing: Cuts, Trims, and Arrangement
The foundation of learning how to edit a podcast for beginners is mastering basic cuts and trims. These are the edits that remove mistakes, tighten pacing, and make your show sound polished.
Removing Mistakes and False Starts
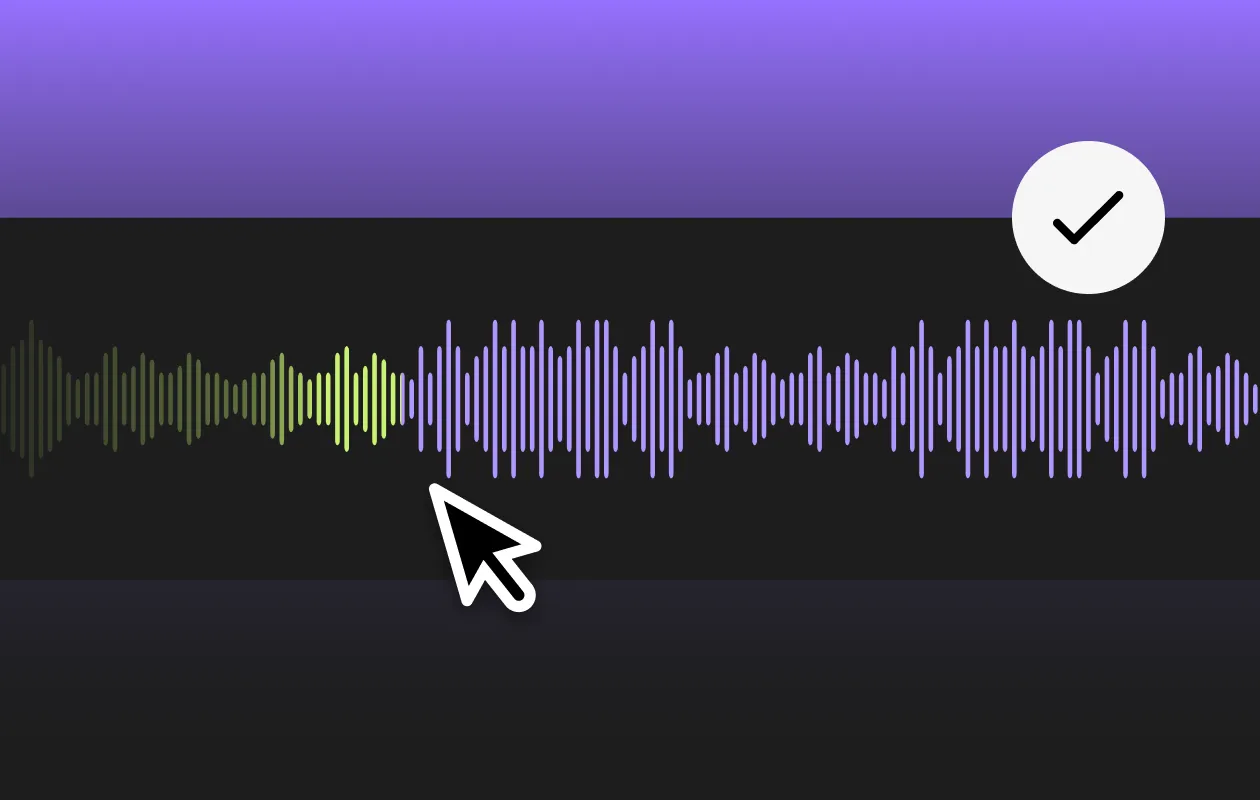
Listen through your recording and identify moments where someone stumbled over words, restarted a sentence, or made a mistake. Select the unwanted audio and delete it, then close the gap by sliding the remaining audio together. In Audacity, use the Selection Tool to highlight the section, press Delete, and the audio snaps together automatically. Leave a tiny gap (about 0.3 to 0.5 seconds) between sentences to prevent edits from sounding abrupt.
Cutting Long Pauses
Natural conversation includes pauses, but podcast listeners expect a tighter pace. Shorten pauses that last longer than two to three seconds by selecting the excess silence and deleting it. Do not eliminate all pauses - some breathing room helps listeners process information. The goal is to trim dead air while maintaining natural conversational rhythm.
Removing Filler Words
Words like “um,” “uh,” “you know,” “like,” and “so” are natural in conversation but can become distracting in a podcast. You have two options: remove them entirely (which sounds cleanest but takes more time) or leave some in to maintain a natural feel. A practical approach is to remove filler words that occur at the beginning of sentences and long strings of filler words, while leaving occasional ones mid-sentence to preserve conversational flow.
Rearranging Content
Sometimes a conversation takes a detour and then returns to a great point. You can cut sections and rearrange them for better flow. Select the section you want to move, cut it, position your cursor at the new location, and paste. Add brief crossfade transitions (0.5 to 1 second) between rearranged sections to make the edit seamless.

Noise Removal and Audio Cleanup
Background noise is one of the most common quality issues in podcasts. Learning how to edit a podcast for beginners includes knowing how to clean up your audio.
Using Audacity’s Noise Reduction
Audacity has a built-in noise reduction tool that works in two steps. First, select a section of your recording that contains only the background noise (no speech) - this “noise profile” teaches the software what the noise sounds like. Go to Effect, then Noise Reduction, and click “Get Noise Profile.” Second, select your entire track and apply the noise reduction with settings of 12 dB reduction, 6 sensitivity, and 3 frequency smoothing as a starting point. Preview the result and adjust if needed. Too much noise reduction creates a hollow, robotic sound, so be conservative.
Removing Plosives and Mouth Sounds
Plosives are the harsh “p” and “b” sounds that cause a low-frequency pop in the recording. If you did not use a pop filter during recording, you can reduce plosives in editing by applying a high-pass filter at around 80 Hz. Mouth clicks and lip smacks can be reduced manually by zooming into the waveform, identifying the sharp transient spikes that represent clicks, and either reducing their volume or deleting them.
De-Essing
Sibilance - the harsh “s” and “sh” sounds - can be fatiguing to listeners, especially on headphones. A de-esser reduces the volume of sibilant frequencies (usually between 4 kHz and 10 kHz) without affecting the rest of the voice. Audacity does not have a built-in de-esser, but you can use the free “Spitfish” plugin or manually reduce sibilance with careful EQ cuts. GarageBand and Descript handle de-essing more easily with built-in tools.
Leveling, Compression, and Volume Consistency
One of the most important aspects of podcast editing is ensuring consistent volume throughout the episode. Listeners should never have to reach for the volume control because one person is too quiet or a section is too loud.
Normalization
Normalization adjusts the overall volume of a track so the loudest peak reaches a target level. In Audacity, select your entire track, go to Effect, then Normalize, and set the target to -1 dB. This ensures your audio uses the full available volume range without clipping. Normalize each speaker’s track separately before mixing them together.